Prompt
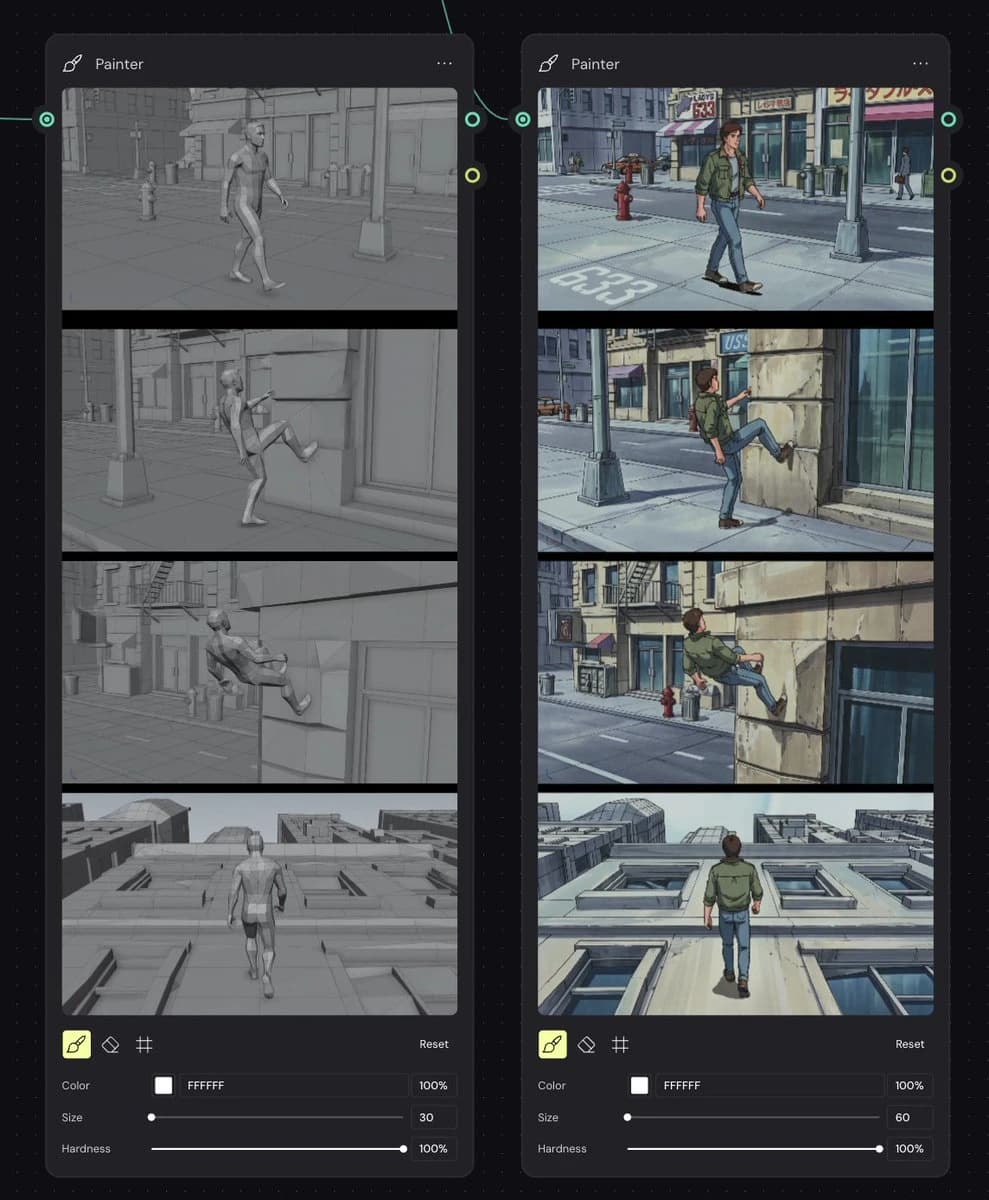
507 wordsGoal: Create a dark node-based workflow screenshot showing a side-by-side comparison between a gray 3D animation storyboard and a re-rendered 90s anime-style storyboard, as if inside a visual AI/compositing tool.
Canvas: Landscape 4:3 screen capture on a nearly black dotted grid workspace. Add thin teal curved connector lines between nodes, with small circular input/output ports on the node edges.
Layout: Place exactly 2 tall rounded-rectangle nodes side by side. Both nodes are titled “Painter” at the top left with a small brush/pen icon, and a three-dot menu at the top right. The left node shows the grayscale source storyboard; the right node shows the stylized output storyboard. Each node contains exactly 4 stacked widescreen storyboard frames separated by thick black dividers, followed by a compact painter control panel at the bottom.
Left node storyboard frames: Render all 4 frames as monochrome gray 3D viewport/cinematic previz images with low-saturation clay materials and simple urban geometry. Frame 1: a generic male mannequin walks down a city sidewalk with storefronts, a hydrant, street pole, and road markings. Frame 2: the mannequin raises one leg toward a stone building wall as if beginning to climb. Frame 3: the mannequin is partially up the wall, body leaning back, legs pressed against the facade. Frame 4: rear view of the mannequin walking upward along a vertical building facade, with windows and rooftop perspective visible.
Right node storyboard frames: Recreate the same 4 actions and camera angles, but as detailed {argument name="visual style" default="1990s hand-painted anime cel animation"}. Use a young adult male character with {argument name="character outfit" default="green jacket, blue jeans, and brown shoes"}, brown hair, and realistic anime proportions. Frame 1: he walks along a sunny city sidewalk past storefronts, a red fire hydrant, streetlight, and road marking “633”. Frame 2: he lifts his foot onto a stone wall beside a glass storefront. Frame 3: he climbs higher on the building facade, with street, hydrant, fire escape, and shop signs in the background. Frame 4: rear view as he walks vertically up the pale building wall, windows receding below him and rooftops visible ahead.
Painter controls: At the bottom of each node show exactly 3 tool icons: a highlighted yellow brush icon, an eraser icon, and a grid/hash icon. Include a small “Reset” label on the right. Under the icons show exactly 3 labeled controls: Color with a white swatch and hex text “FFFFFF” plus “100%”; Size with a slider, left node value “30” and right node value “60”; Hardness with a slider and “100%”.
Visual style: Crisp UI mockup, dark charcoal panels, rounded corners, subtle shadows, muted teal connector accents, precise alignment. The left storyboard should look like a gray 3D render, while the right storyboard should look like a polished anime repaint with blue-gray shadows, ink outlines, hand-painted backgrounds, and cinematic framing.
Constraints: Use exactly 2 nodes, exactly 4 storyboard frames per node, and exactly 3 controls per node. Keep all visible UI text in English. Do not add extra panels, logos, watermarks, or explanatory captions outside the node interface.About this prompt
Storyboard Re-Render Workflow UI is a ready-to-use infographic prompt for GPT Image 2 on Image 2. Copy the 507 words below, paste them into the Create form, and you will get a result close to the preview above. Tweak the Infographic, Mockup, Comic tag if you want to push it somewhere new.
Use it as a starting point, then adjust the subject, lighting, or composition to suit your idea. The credit cost stays the same whether you use it as written or customize it.
Use case
A strong starting point for Infographic
Start here when you want a infographic image inspired by Storyboard Re-Render Workflow UI. The prompt already sets the look and composition; replace the subject, product, colors, or scene details to match your project.
Easy places to tweak
- Subject Swap in your person, product, place, or object without changing the overall composition.
- Look and mood Tune the lighting, palette, camera angle, or materials so the image fits your brand.
- Final format Set the aspect ratio, background, text, or layout notes before you generate.
More prompt paths to explore
Find more GPT Image 2 prompts with a similar style, use case, or subject.
How to use it
- Step 1
Copy the prompt
Hit the Copy button above to grab the full text.
- Step 2
Open Image 2 Create
Head to the Create form and paste it in.
- Step 3
Generate
Hit Generate. Your version lands in seconds.
Make it yours
Load the prompt into the Create form with one click, then start tweaking.